
Engine, Oil Cap, Valve Covers, Carburetor, Air Filter, Distributor, Coil, Ballast Resistor, Generator, Voltage Regulator, Radiator, Hood Latches, Electrical Shielding, Exhaust Manifolds, Transmission, Clutch, Window Wiper Engine, Starter, Fuel Pump
The fitted engine is sadly not the original Corvette '59 engine. Instead it's a 305 cubic inch (5.0 liter) engine originating from a Camero 1983.
The following stamped numbers can be found on it:
V1020DDH 1DN102499
Deciphered:
V : V-8 engine
1020 : model number
DD : Camero
H : 305 cubic inches
1 : check bit
D : 1983
N : Norwood
102499 : serial number

Above, front: Firing Order 18496572 (firing order of the spark plugs);
Right side, back: GM 5.0 LG (5000 cc engine) and 14010201 (casting number), J182 (build October 18, 1982);


Button 201 (left and right) and number 47 near the oil pump;
Right next to the carburetor on the cylinder head: 3866922 GM3 (casting number), J304 (build October 30, 1984);

On the non-Corvette water pump 88002-2 (casting number), A072 (build January 7, 1982).
During the stay at my local garage it seems that only 6 of the 8 cylinders was properly firing. This explained why the car was not driving pleasantly when the RPM is between 2.500 and 4.000 and the wet spots near the right exhaust manifold. When the spark are not igniting on the right moment the fuel runs straight into the manifold and courses backfires.
My local garage helped me out with the timing of the distributor, the valve adjustment and new spark plugs to solve this problem. The engine runs smoothly now...
In the meanwhile I've found via eBay a correct casting (#3756519 b269 F302D?), in running condition engine. It might by from a automatic shifting Corvette (D?) but more likely from a Chevrolette passenger car via e-Bay. I paid only $ 795 for it (incl. crating) and it has a lot of spare parts on it, but unfortunately a lot of them are not of the correct cast date (intake manifold #8746828 p/d-c29, cylinder heads #8765549 c29, exhaust manifolds, carburetor, generator #l102115 9b14, pulley and fan, coil, distributor and voltage regulator #12vn9b 1119002c).


I don't have any room to store it at the moment so I still have to find a solution for this. Also I need to find an engine stand (like on the pictures above) to so working on it is much easier. To build it in will be a next winter job at the earliest since the frame also need some attention to survive the Dutch climate...
![]()
The oil cap, mounted on the engine was correct, so a more correct reproduction was ordered and fitted.

![]()
Via e-Bay I found two very cheap, original valve covers. I paid only $ 49 (+ $ 20 for shipment) which I consider to be a bargain!

![]()
I liked the next two photo's of the (incorrect) carburetor to much to decrease their size. Currently its a Rochester 4 Jet carburetor from another Chevrolet passenger car (probably a '65). In the future (probably next winter) I'll replace this carburetor with the correct Carter WCFB carburetor (which I've already found, rebuild and ordered). Anybody interested in Rochester, available next year ?
.")
")
Some other nice details:


The wing nut needed some restoration (see pictures underneath) or I will replace it titleogether since it is not considered a correct one.


One of those items which can totally change the appearance of your engine compartment is the air filter. IF this is a dented, non-polished original it will probably score more point during the judging contest of the NCRS but since we don't have these in the Netherlands I don't have to bother and therefore I can by a nice, high polished un-dented new repro part.
![]()
The current distributor is also not an Corvette '59 original (see picture below). It doesn't has the needed vacuum pump and the model itself is also not even close.
 ignition coil.")
A rebuild original distributor has been ordered and mounted with breakerless contacts to ensure reliability. My current planning is to replace the existing one with the rebuild original next winter.

If the fitted coil is an Corvette '59 original, I don't know yet. I have to check the number one of these day to be sure.
The ignition coil resistor, as shown on the picture below, can get very hot when the ignition switch is set in the on position due to the current which can flow trough the resistor and coil when the engine is left with the contacts closed. This can eventually burn your coil or contacts. It's advisable to always leave the ignition switch in the off position when the engine isn't running.

![]()
The fitted DC generator is also not correct for our '59 Corvette and mounted, via an incorrect, chromed brace on the wrong (left) side of the engine. A black brace on the right side of the engine is the correct set-up.
The RPM gauge should be connected to the generator (not the distributor, which is the current set-up). The current generator doesn't have the needed entrance and gears for this. A correct generator is therefore ordered. The planning is to get this fitted this winter since the current generator not seems to charge the battery. Also notice the ugly electrical wiring which need to be restored to a proper wiring harness.


![]()
The mounted voltage regulator is a replacement part without the proper casting number and dates. Mary Jo Rohner is still selling original voltage regulators for reasonable prices. When the generator is going to move to the right side of the engine compartment I will also dismount the incorrect voltage regulator and mount the bought original one.
![]()
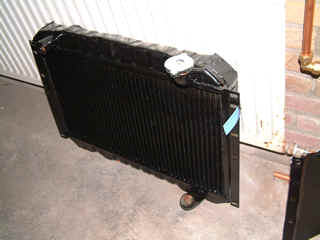
During the pre-RDW-test which we have conducted with the help of our local garage, we noticed that the radiator was leaking. titlehough not cheap, we decided to order a new, correct copper radiator. Because I had to work on the heating circuit anyway, which forces to drain the coolant fluid I combined this task with renewing the radiator. I also found out the lower shroud was missing so that was ordered as well. I gave the whole radiator area a fresh, mat black paintjob (incl. sway bar and upper engine compartment frame). Also notice the additional horns GMDownUnder installed to ensure proper hooting (is this a proper expression, it somehow reminds me on the Bundies ???).
")
Also a correct thermostat housing, new water pump and new water hoses were fitted to ensure proper working. Also the radiator cap wasn't original so replacing this as well finished the job properly. Notice the wrong pressure valve (16 LBS.) is printed on the wrong cap.
.")

The pictures below show the new, correct radiator and the spray painted upper shroud.
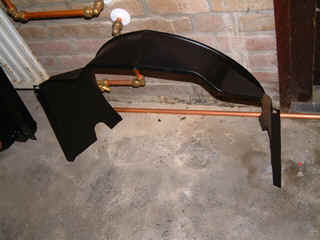
When I mounted the shroud pieces back in (incl. the ordered lower shroud pieces which weren't in my car in found out that the fan blades hit the lower shroud pieces. It is unclear if the fan blades are to large (unlikely) or the Camaro engines has different dimensions. I have removed the lower shroud piece for now to solve this problem temporarily until the newly ordered engine has been mounted in.
When the radiator was also refitted and the water pump and heater where also installed the coolant fluid has been filled by first filling the engine part via the thermostat housing and then filling the radiator. After the first 3 runs I have to check the fluid level to refill if needed.
![]()
Because the engine wasn't a Corvette original the attached water pump was also not correct. CorvetteStop did have a correct water pump (casting #493) on stock so for $ 79 I could fit a the correct one to give the engine a more original appearance. Mounting it caused a small surprise. When I was removing the last bolts of the water pump the whole engine came down because I failed to notice that the engine was mounted with these bolts to the frame. This was not stated in the procedure in one of the books I used. With a jack I was able to lift the engine again to mount the new water pump but I can assure you this caused my heart to skip one or two beats.
One and a half months later, when I finished the whole coolant/heating section, I eagerly restarted the engine to check the pump and heater section for correct behavior. I noticed a lot of smoke out of the engine compartment and a terrible noise from the engine. After a glance in the engine compartment I noticed the pulley and fan didn't rotate freely since the un-original pulley, with double belt ridge was not running free of the new 'correct' water pump and therefore the belt was slipping heavily and causing the smoke. That means ordering an original pulley (and at least wait for another few weeks for it to arrive) to solve this problem. Secondly the strange noise: after a few bad nights puzzling what was wrong I decided to tow the car to the local garage and to put it on a proper bridge to inspect what was wrong. I feared for the worse that I had damaged something due to the accidental engine drop. After unbolting the oil pan I found out the dents caused due to my emergency jacking had caused the oil pan to hit the crank shaft when it rotated. With a hammer and a piece of wood the oil pan has been reshaped and the problem was solved. Since the Camaro engine is not correct anyway I'm not bothered to by a new, un-dented oil pan...
![]()
Because the hood, after closure, spontaneously opens I've decided to replace the male and female hood latches with new ones (safety first). I've donated the originals to Jim Brady (of the Corvette '59 registration site) to help him out with his Corvette restoration project. The parts were easy to replace. Just make sure (double check !) that the cables are attached properly because when they don't you'll have a serious problem re-opening your hood !

|
|
|
![]()
To minimize radio interference, caused by the spark plugs, distributor and generator a slick chrome shielding should be installed in the Corvette. This option was only available in cars fitted with the Wonderbar radio. Several ground straps and capacitors should be installed to reduce clicks, hisses and other unwanted noises. In our car the shielding was completely missing so, after checking if it would fit on the 305 Camero engine, we decided to spend a couple of hundred dollar to re-install this cool looking option. After 4 hours of puzzling and hard work trying to reach the difficult areas to fit the all bolts I managed to get it installed (e.g. the spark plug shielding bolts were a real challenge to install).

And the chrome spark plug shielding:
.")
![]()
The exhaust manifolds as found in our Corvette were chromed with a lot of pitting and nor correctly numbered (#3749965 & #3750556). Back in 1959 these were mounted on the engine and spray painted orange during the painting process. A lot of Corvette enthusiasts think the Corvette design team never intended this during the car design and allow themselves to paint the exhaust manifolds in a different color (e.g. black or silver). titlehough this is a bit cheating in the restoration process I agree that it looks much nicer and therefore I will leave them silver as shown in the picture below.

![]()

