Heating and Fresh Air
Our new old-timer was, when delivered, not equipped with a working heating or fresh air control. titlehough this option was originally available with the car it was completely striped out of the car with exception of the control knobs, fan switch and heater core/motor. The defroster box, hot air bezels, defrost air hoses (and vacuum cleaner like mouth pieces under the dash) and hot water hoses were all missing. After ordering all the missing bits I could start on getting this all fixed.
Draining Coolant Fluid, Fresh Air Control, Temperature Control, Fan Speed Switch and Defroster Knob, Heater Core, Defroster Box & Air Hoses, Hot Water Hoses, Hot Water Valve
If one of the following actions is required the coolant fluid needs to be drained:
Replacement of the heater core
Replacement of the heater valve
Replacement of the hot water hose(s)
Replacement of the radiator
Replacement of the radiator hose(s)
Replacement of the thermostat
Replacement of the water pump
Refreshing the coolant fluid
The following steps are needed to drain the coolant fluid:
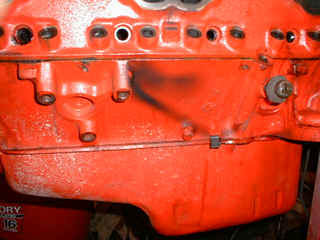
Drain the radiator: underneath the radiator there is a drain cock and a rubber tube. Open the cock to drain the appr. 2 gallons of coolant fluid.
Drain the remaining coolant fluid which resides in the engine itself by removing the drainage bolts (see one of them on the middle of the picture below, just above carter pan). A coffee cup of fluid will be drained for each side of the engine. You might need to free the opening with a screwdriver to get the fluid removed because sometimes the entrance is blocked.
Remove the lower radiator hose: keep in mind that some fluid still resides in the hose so be careful not to spill it on sensitive parts.
Remove the upper radiator hose: same story here.
If needed remove the hot water hoses: be very careful with your carpet, better protect it with some plastic to prevent stains due to spilling of remaining fluid.
![]()

This was one of the first and easiest jobs I did on the car. The same evening I got the car in our garage I attached the air control cable onto the air control valve in the fresh air channel (near the firewall). Of course I supplied a little oil onto the cable to make it run smoothly.

![]()
The present heater core was sadly not connected to the water pump (mounted in the front of the engine). The sucked in air will therefore not get heated to a pleasant temperature when the Temp knob is set. In practice this means warm clothes, socks and ear warmers are a necessity to drive our Corvette from October till April. Of course this is not acceptable. Therefore quite a few bits are needed. First of all, just to be sure I replaced the water pump with a correct, rebuild one since the present one wasn't a Corvette original but probably the one which was on the fitted engine (see the Under the Hood page). The current water pump had two closing fittings where the hot water hoses should connect to the pump so the needed fittings were ordered. Also the needed hoses (5/8" and 1/2" were ordered). When these arrived I found out I needed 4"of additional 5/8 hose and a 90 degrees elbow piece to make the 1/2" hose fit to the heater core. Just to be sure I decided also to order a new heater core to ensure the whole heating circuit would be in excellent condition. I'm currently putting the last hand on this challenge so I keep you posted...

The heater valve and missing elbow and the 4" of 5/8 heater hose (I still have to find a solution for easy getting my hands on this hose piece since in Europe we don't use inch-sizes).

![]()
The defroster knob controls two functions:
Fan speed (off, low and hi)
The amount of air which should be blown against the windows (via the bezels on top of the dash, near the front window).

The fan speed switch was easily back in operation. The only thing I had to do was re-attaching it to the (non-correct) motor of the heater box, cleaning the inside of the switch and replacing the 2.7 ohm/25 Watt resistor to make it work again. I've also oiled the attached cable and replaced the knob with a correct new one to make it look real good (not displayed on the picture, this is still the old knob).

![]()
The heater core was the only part which indicated that our Corvette was fitted originally with the heating option (together of course with the dash panel with the heating related knobs). I decided anyway to replace the existing heater core all the same since you never know in what condition it's in. When I fill the whole hot water circuit with coolant fluid and it starts dripping on my new interior carpet I would be very cross with myself for not replacing it so I spend another hundred euro on a new heater core (together with a new valve).
First the right female hood latch is removed together with the right part of the chrome shielding. Then I removed the four nuts which hold the air inlet mouth piece. If you look closely the heater core is already visible through the air inlet on the picture underneath:
.")
Next I removed the tray underneath the Sissy-bar and the fiberglass interior piece behind it. Loosen the defrosterbox via the 3 Philips screws. Now I was able to take the whole heater box out.
.")

First of all I removed the air inlet mouth piece by carefully loosening the four rivets of the bolts. Then I removed what was left of the gasket and cleaned and sanded it completely. By paint spraying it black it became as good as new again:


The next step was to remove the mounted heater core. I removed the rubber elbow leading to the heater valve. Of course this part needs renewal as well since it is almost disintegrating so it will be added to the Christmas shopping list together with the needed new heater core.

Also the inside of the heater box, titlehough not visible will be cleaned and sanded to make because I can't stand knowing it would still look like the picture underneath:

Also the shell shaped air blower needs a repaint to make it all look brand new:

Last but not least the heater valve mounting bracket needs sanding and painting. Notice the still readable gasket part. nr.:


The heater box was quickly enough assembled when the heater core and needed gaskets arrived. Mounting it back in the car is also a piece of cake together with attaching the heater hoses. After starting the engine the restored heater box could be tested on proper working.
(Thanks to Al Cellier and Scott Daniel for their advise !)
![]()
The valve (and the defroster box), air hoses and 'vacuum cleaner' like mouth pieces to lead the air to the defroster bezels was completely missing (clearly shown in the picture below). The needed defroster box was ordered and attached to the heater box with the three needed screws and also two brand new, correct air hoses were attached to two original, matching numbered, mouth pieces ($ 119 each). I sanded the mouth pieces carefully and spray painted them in its original black color.

Two new dashboard bezels were also ordered and after spraying them in the needed Turquoise color they could be fit in the dashboard. Cutting the needed holes in the dashboard has been done with a Stanley Knife (very scary job) since the needed slots were presently not available in the dashboard cover.
.")
![]()
To connect the heater core to the water pump it needs to be hooked up with new water hoses. When you order a pair of '59 hoses you end up with a 5/8" hose (inside diameter) and a 1/2" hose. When you look at your heater core it has two 5/8" fittings so what's the trick ? Apparently you need another piece (app. 4 inches) of 5/8" hose (that means another month delay to get this item) and an additional copper elbow. This elbow takes care of the transition of the 5/8" to 1/2" hose diameter. One the picture below you can see it wrongly hooked up. I was quite puzzled at that time since the hose wasn't long enough to reach the water pump in this setup. As soon as I receive the needed parts I'll make a new picture of how it should be fitted properly.

The next picture shows my new slightly curved 1/2" hose nipple on the water pump:

The other side of the heater core connect, via a 5/8" rubber hose elbow to the heater valve. The other side of the valve sticks through the firewall and ends up in a 5/8" fitting to connect the 5/8" hose to the water pump. I'll include additional pictures of the water pump connections when this is set-up properly.

![]()
The hot water valve is one other bit already present in our car. But also here I decided it would be wise to replace it with a new one to ensure proper functioning. Of course the old one will be save for sentimental reasons. I persume it can't be very difficult to replace the valve, this is still a job to be done...
![]()